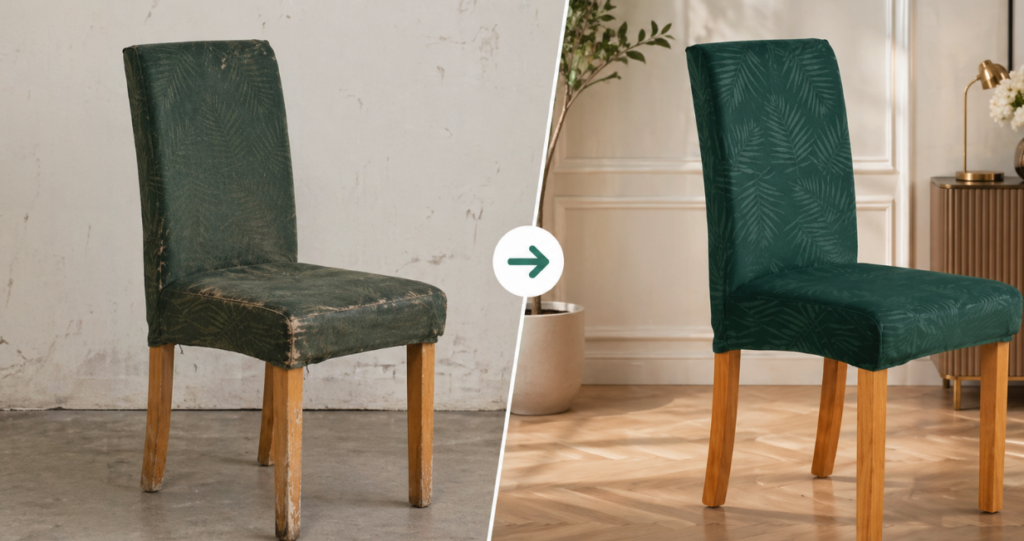
How To Cover A Dining Chair
If you want to give dining chairs a brand new look or even create that high-end feel of big-name furniture, the most reliable and effective method is “wrap-and-staple”.
First turn the chair over and use a screwdriver to remove the seat cushion from the wooden frame. At this point, you have to touch the original sponge pad first—if it feels like it has collapsed, be sure to add a 1-inch thick layer of high-density sponge and wrap it with a layer of polyester batting on the outside to create that round, full arc, which is what we often call “high-end feeling”. The choice of fabric is even more crucial, and I usually recommend fabrics like velvet or thick linen that are hard-wearing and textured. Lay the fabric flat right side down, place the cushion on top, and secure with a manual or electric nail gun.
To get a finished product without a wrinkle, the stretching force must be even. Be sure to start nailing from the exact center of each side and work your way around to ensure the fabric is tight but the texture isn’t distorted. As for handling the corners, this is often the biggest headache for beginners. You need to pull the fabric toward the center of the cushion, fold it into neat and smooth folds, and finally nail them firmly. This “no sewing” method not only saves money, but also produces very professional results. It can definitely withstand the hardships of daily use and instantly enhance the style of the entire restaurant.
Choosing The Right “Foundation” Is Important
The success of a dining chair renovation depends largely on the materials you choose. If you want to make that kind of texture in a furniture showroom, fabric selection is definitely the first priority. When choosing fabrics for Boqian Textile, I would strongly recommend prioritizing those “heavyweight” textiles.
- Fabric Selection: As I mentioned earlier, velvet and linen are the gold standard. High-density velvet has an understated sheen and a high wear resistance factor, while premium linen offers a breathable, classic aesthetic.
- Cushion core: Before wrapping the fabric, you must check whether the base is stable. Using a 1-inch high-density sponge can effectively prevent that harsh feeling “sitting to the bottom”, while spray-on cotton is the cushioning layer between the fabric and the sponge, which can reduce friction and extend the life of the chair.
Step 1: Disassemble The Chair
Start by turning the chair upside down in a clean place that won’t scratch the surface. Use a manual or electric screwdriver to remove the screws securing the seat cushion. You need to put the removed screws into a small box specifically to save myself the trouble of looking for them when I finally put them back. Once you remove the wooden frame, you’re left with a crisp cushion base to start your work.
Step 2: Lay The Sponge And Spray Cotton
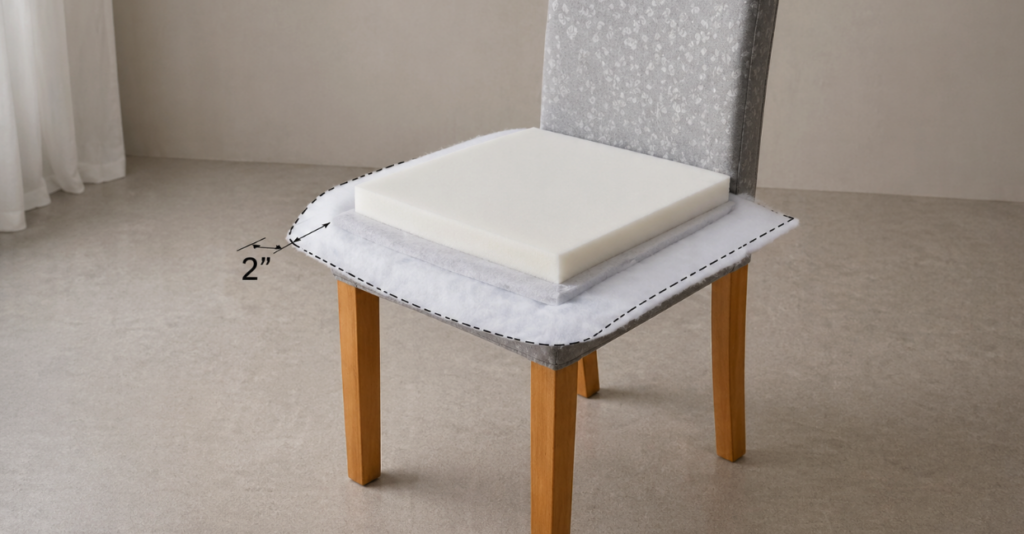
If your chair cushions feel flat on them, now is a good time to add some extra ingredients.
- Cut the sponge to the exact same size as the seat.
- Cover the sponge with a layer of spray cotton, leaving about a 2-inch margin around the edges.
This so-called “filling” technique is key to creating the rounded edges of designer furniture, which cleverly hides the sharp edges of the wooden base.
Step 3: Nailing “Center Out”
This is the most critical step in determining whether the finished product has wrinkles or not. Lay the fabric woven in front of the blog face down, and make sure the texture of the fabric is straight.
- Fixed point fixing: First drive a nail into the exact center point of each side.
- Force Control: Pull the fabric in your own direction with force and evenness before you pull the nail gun. The goal is “tight but not twisted”. If you pull too tight, the pattern will go out of shape, and if you pull too loose, it will wrinkle after a few sittings.
- Extension: Start at the center point and push toward the corner, driving a nail every short distance, but stop about 2 inches from the corner.
Step 4: Get A Professional Corner
To eliminate the bloat, you can do this:
- Pull the fabric in the corners directly toward the center of the cushion.
- Tuck in the extra fabric on both sides and fold it into neat, symmetrical pleats.
- Make sure the pleated opening is facing away from the front of the chair for the cleanest visual effect.
- Drive a few more nails to secure the heavy fabric to the wooden base.
Final Assembly And Quality Inspection
After nailing is complete, trim off any excess fabric so it doesn’t block the screw holes or interfere with the wooden frame. Return the new cushion to the wooden frame and screw back in the original screws.
In fact, this job is not that mysterious. As long as you follow this professional process “no sewing required” and add high-quality materials such as Boqian Textile, you can also make a durable and beautiful finished product. The sense of accomplishment that comes with this renovation is much greater than just buying a new chair.
Author: Alex Reed
Hi, I am a furniture renovation enthusiast and interior stylist with years of hands-on experience in bringing tired pieces back to life. I believe that high-end design shouldn’t always come with a premium price tag. By combining professional techniques—like the “wrap-and-staple” method—with exceptional materials from Boqian Textile, I help homeowners achieve showroom-quality results on their own.